


A tripod is an essential accessory for shutterbugs, videographers, and content generators. Whether you want to stabilize your camera, smartphone, or other bias, a sturdy tripod is a must-have. still, marketable tripods can be precious, and occasionally, you may need a new bone in an exigency. This companion will show you how to make a tripod fluently using affordable accouterments.
By making your claim tripod, you not as it were spare cash but moreover pick up the adaptability to customize it agreeing to your needs. Whether you require a compact tripod for travel or a more vigorous adaptation for proficient utilize, a DIY approach permits you to test with different plans and materials.
Additionally, building one yourself is a incredible way to learn almost camera stabilization procedures, making a difference you make strides your photography and videography aptitudes. The handle is clear, and with fair a few essential materials, you can create a tripod that is both useful and strong. So, let's investigate how you can make a high-quality tripod without breaking the bank!

Why Make Your Own Tripod?
Before diving into the way, let's bandy why making a tripod at home is salutary.
Cost-Effective marketable tripods can be expensive, especially for high- quality, professional- grade models. A DIY tripod can be made with minimum investment using everyday accoutrements.
Customizable Manual tripods allow you to modify the height, stability, and design according to your specific requirements.
Movable and Featherlight You can produce a featherlight tripod suitable for trip, hiking, or out-of-door firing.
Eco-Friendly By using recyclable accoutrements like wood, PVC pipes, or essence rods, you contribute to a further sustainable terrain.
Material Required
To make an easy tripod, you’ll need the following accoutrements
-
Three sturdy sticks or PVC pipes (for legs)
-
A small rustic or essence plate (for the camera mount)
-
Bolts, nuts, and screws
-
A drill
-
Rope or zip ties
-
Cohere or strong tenacious
-
A smartphone holder (voluntary)
-
A ball head or swivel mount (voluntary for better adaptations)
Now, let’s get into the step- by- step process.
How to Make a DIY Tripod?
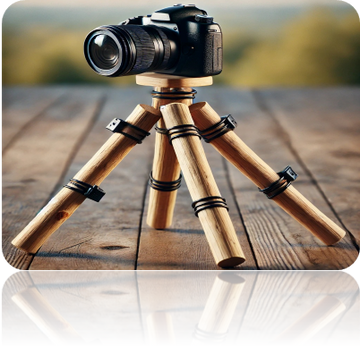
Step 1: Opting for the Right Material for Legs
The first and utmost pivotal step is choosing the legs. You can use
-
Wooden sticks (strong but slightly heavy)
-
PVC pipes (featherlight and easy to cut)
-
Essence rods (sturdy but heavy) Make sure the length of the sticks or pipes is at least 3 bases for stability.

Step 2: Creating the Tripod Base
-
Arrange the three sticks or pipes into a tripod shape.
-
Secure them together at the top using a strong rope, zip ties, or screws.
-
Ensure the legs spread unevenly to give a stable base.
Step 3: Attaching the Camera Mount
-
Take a small rustic or essence plate to act as the mounting face.
-
Drill a hole in the centre to fit a bolt (1/ 4- inch, standard for camera mounts).
-
Secure the bolt tightly using a nut, icing it holds the camera forcefully.
-
Attach this mount to the top of the tripod using screws or strong cement.
Step 4: Enhancing Stability
-
Wrap fresh rope around the legs for redundant stability.
-
Attach rubber grips or froth to the bottom of the legs to help slipping.
-
If using PVC pipes, fill them with beach for added weight and stability.
Step 5: Adding a Swivel or Ball Head (Optional)
For better angle adaptations, attach a ball head or a swivel mount to the camera plate. This will allow smooth tilting and gyration.
Step 6: Testing the Tripod
-
Place your camera or smartphone on the mount.
-
Acclimate the legs to insure balance.
-
Make any necessary variations for bettered stability.
Indispensable DIY Tripod Ideas
If you’re looking for other easy ways to make a tripod, here are a few quick alternatives:
1. String Tripod
A string tripod is a super easy and movable option. Then’s how to make one
-
Take a 6- bottom-long strong string.
-
Tie one end to your camera’s bottom screw hole.
-
Stand on the other end while pulling the camera overhead.
-
This creates pressure and helps stabilize the camera.
2. Bottle Tripod
-
Take a sturdy plastic bottle and fill it with beach or water.
-
Attach a smartphone mount or camera screw to the cap.
-
This works as a temporary tripod for quick shots.

3. Chair Tripod
-
Place a camera or phone on the backrest of a president.
-
Secure it with rubber bands or tape recording.
-
Acclimate the angle as demanded.
Tips for Making a More Professional DIY Tripod
-
Use high- quality accoutrements If you plan to use the tripod constantly, conclude for essence rods rather of sticks.
-
Ensure height adjustability Consider using telescopic rods or malleable PVC pipes.
-
Add a quick- release plate This makes it easier to mount and remove your camera.
-
Paint and finish Give your tripod a professional touch by painting it or adding grip handles.
Conclusion
Making a tripod at home is easy, cost-effective, and fun. Whether you need a temporary tripod for photography or a sturdy bone for professional use, this companion has covered multiple styles. By using simple accouterments like rustic sticks, PVC pipes, or indeed managing particulars, you can produce a dependable tripod in no time. So, why spend plutocrats on precious tripods when you can make your own? Try these DIY styles and enjoy stable, high-quality shots without breaking the bank!
So, why spend money on expensive tripods when you can make your own? Attempt these DIY strategies and appreciate steady, high-quality shots without breaking the bank! Additionally, building your claim tripod permits you to explore with distinctive materials and setups, guaranteeing you get a custom arrangement custom-made to your particular needs. Whether you're a beginner picture taker, a vlogger, or somebody who adores DIY ventures, this is an fabulous way to improve your shooting involvement.
By making your claim tripod, you too create down-to-earth problem-solving abilities, permitting you to adjust and make unused arrangements based on accessible assets. You can alter the plan for distinctive landscapes, alter its stature for different shooting points, and indeed personalize it with interesting colors or designs. This DIY approach not as it were spares cash but moreover cultivates inventiveness and development, making your tripod a genuine reflection of your inventiveness. With a small imagination and exertion, you can create a strong, flexible, and dependable tripod that meets your desires where as sparing cash. Upbeat creating and upbeat shooting!
